The easiest way to make a tasty biryani – let’s see how to prepare chicken vadi biryani | marriage style.
Chicken Vadi Biryani
Chicken Vadi Biryani in our YouTube channel has been viewed by more than 9 Million times and one of the most proven methods for homemade marriage style biryani.
Here we go!
Chicken Dum Biryani Vs Chicken Vadi Biryani
The recipe Chicken Dum Biryani differs with chicken vadi biryani where the earlier involves cooking the rice, meat and spices all along and in later, rice is half boiled separately and mixed with cooked meat marinade. To try Chicken Dum Biryani, Click here.
In this recipe, we are going to do 1kg chicken vadi biryani which will serve around 7 people in a family.
Ingredients
- Basmati Rice – 1 Kg
- Chicken – 1 Kg
- Oil – 200 ml
- Onion – 400 Grams
- Cinnamon – 1 Gram
- Cardamom – 1 Gram
- Clove – 1 Gram
- Coriander Leaves – 1 Handful
- Mint Leaves – 1 Handful
- Ginger – 100 Grams
- Garlic – 50 Grams
- Red Chilli Powder 2 Tablespoon
- Salt – 2 Tablespoon (For Masala)
- Curd – 200 ml
- Green Chilli – 3
- Tomato – 400 Grams
- Water – 800 ml ( For Masala)
- Water – 3 Litres (To Boil Rice)
- Salt – 2 Tablespoon – (For Rice Boiling Water)
Steps to Prepare
Rinse 1 kg of basmati rice softly in clean water. Repeat it again and soak it in a bowl with fresh water. Do this when you start cooking. Keep it aside.
Take a suitable vessel that can cook 1kg rice and 1 kg meat. Add 400gms of thinly sliced onions in the pan and fry it with 200g cooking oil.
Add 1 gram each of cinnamon, cardamom and cloves to it.
Fry the mixer in a medium-high flame until the colour of onion becomes reddish-brown. Frying onion to reddish brown will give a good flavor and taste to the biryani.
Once onion and spices become reddish brown, turn the stove to low-flame and add each handful of coriander leaves and mint leaves to the pan. The mint and coriander give good aroma to the biryani which will last throughout cooking.
Add 3 green chillies and 2 tablespoons of red chilli powder and continue to fry it in lowflame.
The secret behind adding chilli powder before ginger-garlic paste and tomatoes is that the chilli powder will mix well in oil and will give good colour to the biryani so that adding an artificial colour is not required.
Take 100g of peeled ginger and 50g of garlic, grind them until it becomes paste. Add this ginger-garlic paste and saute it for around 1 minute. Ginger-garlic paste is one of the main ingredients which gives rich taste and flavor to the biryani.
By this time, you could see a colourful gravy with rich aroma. Add 2 tablespoon of Salt and 200ml of curd. Cook it for 30 seconds.
Finally, add 400g of sliced tomatoes. Irrespective of the quantity of biryani, the ratio of the Tomato and onion should be the same.
Please note, we have not added any biryani masala or customized masalas here. This method is good enough to get an authentic marriage style ‘Kalyana Biryani’.
Saute the mixture quickly in high flame for 1 minute. Add 800ml of water to the gravy and mix it well. You could see the rich colour in the gravy even without adding any food colour.
Close the vessel and heat the gravy in high flame until it starts boiling.
Meanwhile, light another stove and keep a vessel to make half-boil basmati rice. Add 3 litres of water and allow it to boil. Do not add rice now.
After the gravy vessel starts boiling (it will take around 10 mins), turn it to low flame and cook it for another 5 mins by keeping the vessel closed. This will allow tomatoes and chillies to get mashed nicely.
Add 1 kg medium-size cut, washed and drained, chicken pieces into the pan. For 1 kg rice, you can add from 1kg to 1.5kg chicken. Mix well and allow to cook in high flame for not more than 2 minutes. You could see vapour comes out from the closed vessel.
Cooking chicken in low flame will make the taste of gravy get well mixed into chicken which will add taste to chicken. Chicken will be cooked 1/4th with gravy by now and remaining 3/4th will be cooked along with rice.
Meanwhile, filter the soaked rice and allow it to drain. Add the rice into the boiling water in the rice vessel. Add 2 tablespoon of salt and mix it gently. The salt taste in water should be a bit higher than normal. After 2 minutes of adding rice, rice would be ready with a half-boiled stage (50% cooked). Carefully filter out the half-boiled rice and allow it to drain. Keep the filtered water for sometime as we may need it.
While rice is draining out, check for salt, sour and spicy taste in the gravy. All these 3 tastes should be a little higher than gravies we usually prepare. This is because when we add the half-boiled rice to this gravy, the taste will be shared and neutralized with the rice and get matched. In case, if you need more sour taste, you can add a lemon’s juice to this gravy at this point.
Add the drained half boiled rice to the gravy vessel now without disturbing chicken pieces. The rice should be completely immersed into gravy. If rice is not completely immersed, add the filtered water which we kept aside in step 16 to this until rice and gravy comes to the same level.
Now close the vessel and keep it in high flame. Place some weight over it.
After 1 minute, you could see vapour coming out from the vessel which indicates it started boiling inside. Now, turn the flame to low and cook it for another 15 to 20 minutes. Depending on your stove, the vapour would come again in another 15 to 20 minutes. This shows our biryani is prepared inside.
Take out the vessel lid and inverse the top layer of rice to a little down without touching or disturbing chicken or gravy at the bottom. Switch off the stove and close the vessel with lid and allow for some time.
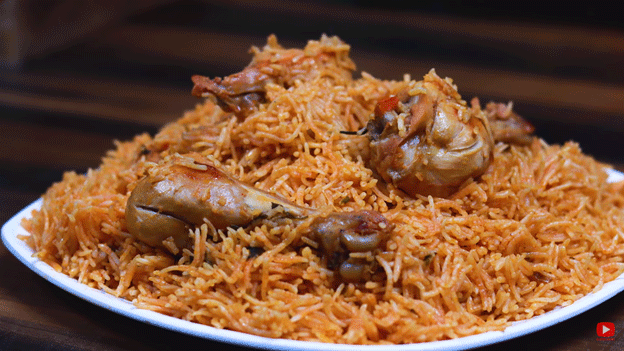
Our most awaited chicken vadi biryani is ready!!!
Try the recipe and post your comments if you really enjoyed it.
Serve the dish and get the accolades!!!
———-x———-x———–x——-
Serving Suggestion – Chicken Vadi Biryani can be served along with Onion Raitha, Brinjal Chutney and sweets!
———-x———–x———-x———
Related Recipes – Chicken Dum Biryani, Mutton Dum Biryani, Quail Biryani